Category: Email Members
Clicking "Email Members" on the Administration menu brings up the Find Members form. This form is used to find members in the database and generate reports based on the results of the query. You can find members by name, type, email, age, team position, or team membership. If you enter nothing on the form, all members will be returned. Names will be found that begin with the letters you type. Entering "sm" will find all Smiths or Smyths, etc.
Text Messaging
The email members option will also allow you to Text Message members from the site. To do this, change the Report Type at the top of the Find Membrs page to include the Text Message option.
Ranges, such as "Between the age of," can be used to find members who fall between a range of values. A number in the first field will find members with a value greater than or equal to the entry. Likewise, a number in the second field will find members with a value less than or equal to the entry.
You can select more than one team position or team name by holding down the Ctrl key and clicking the desired choices. To select a range of choices, drag (hold down the left mouse button) while moving the mouse over the desired choices.
Queries are additive
That is, specifying selections in more than one field means that member data must match all the selections specified. For example, setting the Type drop-down menu to "Parent" and the Has Email menu to "No" would yield only members who are parents and don't have email addresses. Note, however, that when you select more than one item in either the "Position" or "Team" lists, the selections within the list are put together with the "Or" operator. That is, any member belonging to any of the selected teams (or selected positions) will be selected. This only applies within the list, however. The selected teams are still put together with the other fields on the form, with the "And" operator as already explained.
Once you have specified your search criteria and the Report Type is set to Email Members, click Find at the bottom of the page.
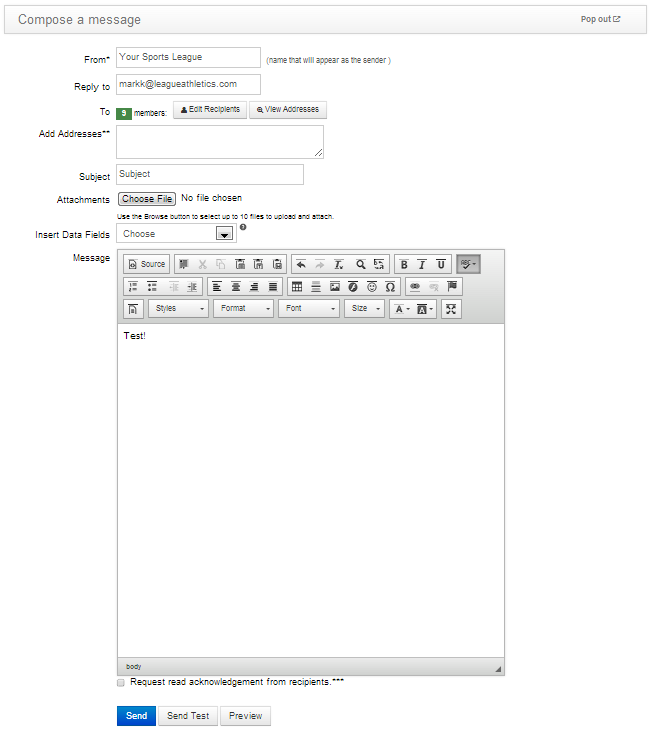
On the resulting page you can compose your message and send this to all of the members returned in the query. See below...

- From
- Enter the name of the person or organization you wish to send this email from. This should be a name, not an email address.
- Reply to
- Enter the email address you would like people to reply to when they receive your message. Ideally, this should be your email address so that when people respond to the email you send, you will get the replies and be able to respond. The email entered here will also be sent the Test Email message when clicking the Send Test button at the bottom of the page.
- To
- This shows you how many people you will be sending the email to. You can view the list of people by clicking the Edit Recipients button or view all of the email addresses you'll be sending to by clicking View Addresses.
- Add Addresses
- For people that may not exist in your database, you can enter their email addresses here and they will be sent the message as well.
- Subject
- Enter a subject for your message that will be sent.
- Attachments
- Optionally, you can add up to 10 attached files by clicking the attachments button.
- Insert Data Fields
- Use these options to insert variable data fields into your email. For example, if you want to personalize the message you may add something like...
Dear [Member_First_Name],
When the message is sent, this will be automatically filled in with the member's first name.
The checkbox to the right of this field will automatically be selected when a Data Field is added. Optionally, if you have composed an email outside of the site and pasted content with the data field format described above, you can manually check this box. - Message
- Insert a plain text or html message into the body.
- Schedule email to be sent
- Optionally, check this box and enter a date and time in the future when you would like this email to be sent. When the "Send" button (blue) is clicked, this email will be scheduled and then sent at the time indicated. You can check that it has been sent at that time by going to your email log
Admin > Misc > Email Log. If you want to send the email right away, do not select this option and click "Send".
Deleting a scheduled message
Go toAdmin > Misc > Email Log. At the top of the page, click the link to view your scheduled emails. On the resulting page, click the delete icon to delete the message and prevent it from being sent. - Send (blue button)
- Clicking the Send button will send this message to all of the members listed in the To field.
- Send Test
- Clicking this button will send a test message to the emails addresses listed in the Reply to field. This is a nice way to be sure you message is formatted properly.
- Preview
- Clicking Preview will display a modal with your formatted message. This is a quick way to view your message prior to sending.
Heads-up! If you want to view your sent messages and confirm they have been sent to your members, go to Admin > Misc > Email Log once the message has been sent. For help regarding the email log, see this information.